Battery switch on travel trailer function is crucial for managing your RV’s power. Understanding how your battery switch works is key to preventing electrical problems and maximizing battery life. This guide dives into the different types of switches, troubleshooting common issues, and best practices for safe and efficient power management in your travel trailer.
We’ll cover everything from basic functionality and wiring diagrams to advanced troubleshooting techniques using a multimeter. Learn how to choose the right switch for your needs, extend your battery’s lifespan, and maintain your system for years of reliable service. We’ll also explore safety precautions and provide a helpful FAQ section to answer your most pressing questions.
Understanding Battery Switch Functionality in Travel Trailers: Battery Switch On Travel Trailer Function
A battery switch is a crucial component in a travel trailer’s electrical system, allowing you to manage power flow from your house batteries and potentially from shore power. Understanding how it works and how to install it correctly is essential for safe and efficient operation of your RV. This section will cover the different types, wiring diagrams, installation, and advantages and disadvantages of common battery switch designs.
Types of Battery Switches
Travel trailers typically utilize one of three main types of battery switches: a simple on/off switch, a two-battery switch, and a battery isolator. The simple on/off switch is the most basic, connecting or disconnecting your house batteries from the trailer’s electrical system. A two-battery switch allows you to select between two battery banks (e.g., one for starting and one for house use), or to connect both in parallel.
Battery isolators, often combined with charging relays, automatically manage power flow based on charging sources and battery voltage levels.
Typical Wiring Diagrams for Battery Switch Setups
The wiring for a battery switch varies depending on the type of switch and the complexity of your electrical system. A simple on/off switch will have a relatively straightforward diagram: a single wire connecting the battery’s positive terminal to the switch, and another wire from the switch to the main power distribution panel. A two-battery switch will include two sets of these connections, one for each battery bank, with a selector switch to choose the active bank.
A battery isolator’s wiring is more complex, involving additional wiring for the charging system and possibly a second battery. A visual representation of these, though not provided here, would show clearly labeled wires connected to the relevant terminals on the batteries, switches, and distribution panel. Properly color-coded wiring is crucial for easy troubleshooting and maintenance.
Step-by-Step Guide on Correctly Installing a Battery Switch
Installing a battery switch requires basic electrical knowledge and adherence to safety precautions. Always disconnect the negative battery terminal before starting any work. First, choose a suitable location for the switch, ensuring it’s easily accessible but protected from the elements. Mount the switch securely and connect the wires according to the manufacturer’s instructions and your chosen wiring diagram.
Pay close attention to wire gauge and use appropriate connectors. After installation, carefully check all connections for tightness and correct polarity before reconnecting the battery’s negative terminal and testing the system functionality. Remember, consult a qualified electrician if you are not comfortable performing electrical work yourself.
Advantages and Disadvantages of Various Battery Switch Designs
Each battery switch type offers different advantages and disadvantages. A simple on/off switch is inexpensive and easy to install, but offers limited control. A two-battery switch provides greater flexibility in managing power from multiple batteries, but is slightly more complex. Battery isolators provide automatic management, preventing overcharging and maximizing battery life, but they are typically the most expensive and require more intricate wiring.
The best choice depends on your specific needs and budget. For instance, a simple camper might only need a simple on/off switch, while a larger RV with multiple batteries might benefit from a more sophisticated system like a battery isolator.
Troubleshooting Common Battery Switch Issues
Your travel trailer’s battery switch is a crucial component, controlling the flow of power to your house batteries. When it malfunctions, it can leave you stranded without lights, appliances, or even the ability to charge your batteries. Understanding common problems and troubleshooting techniques is essential for maintaining your RV’s power system.
Common Battery Switch Problems
Several issues can arise with your travel trailer’s battery switch. These often manifest as a complete lack of power, intermittent power fluctuations, or an inability to switch between battery banks. Corrosion on the terminals is a frequent culprit, hindering proper electrical contact. Internal failures within the switch itself, such as worn-out contacts or broken internal wiring, can also cause malfunctions.
Finally, a blown fuse within the switch (if equipped) will prevent power from flowing.
Troubleshooting a Battery Switch That Won’t Turn On
If your battery switch refuses to turn, systematically check these areas. First, ensure the switch itself isn’t stuck or jammed. Try gently working the switch back and forth, applying only moderate force. Next, inspect the switch for any visible signs of damage, such as cracks or burns. Check the connections at both ends of the switch.
Look for loose wires, corrosion, or signs of overheating. Clean any corroded terminals with a wire brush and apply a corrosion inhibitor. If the switch incorporates a fuse, check its integrity. A blown fuse will need replacing with one of the same amperage rating. If none of these steps resolve the problem, the switch itself may be faulty.
Diagnosing a Faulty Battery Switch with a Multimeter, Battery switch on travel trailer function
A multimeter is invaluable for diagnosing battery switch problems. First, verify your batteries are charged; a low battery voltage could mask a switch problem. With the switch in the “off” position, check for continuity across the switch terminals. There should be no continuity (infinite resistance). If you measure continuity, it indicates a short circuit within the switch, signifying a faulty unit.
Next, switch to the “on” position. Now you should measure very low resistance (close to zero ohms) indicating a good electrical connection. If the resistance is high or infinite, this points towards an internal problem in the switch or a poor connection. Remember to always observe proper multimeter safety procedures.
Troubleshooting Battery Switch Problems Flowchart
The following flowchart Artikels a step-by-step approach to troubleshooting your battery switch:
Start → Check Switch for Obstructions → Yes (Obstruction): Clear Obstruction → Test Switch → No (Obstruction): Proceed → Inspect for Damage → Yes (Damage): Replace Switch → No (Damage): Proceed → Check Connections for Corrosion/Loose Wires → Yes (Corrosion/Loose Wires): Clean/Tighten → Test Switch → No (Corrosion/Loose Wires): Proceed → Check Fuse (if applicable) → Yes (Blown Fuse): Replace Fuse → Test Switch → No (Blown Fuse): Proceed → Test Switch with Multimeter (as described above) → Switch Faulty: Replace Switch → Switch Functional: Problem Elsewhere
Battery Switch and Power Management

The battery switch is the central nervous system of your travel trailer’s electrical system, controlling the flow of power between your house batteries and the various appliances and systems within your RV. Understanding its function is crucial for efficient power management and extending the lifespan of your batteries. It acts as a gatekeeper, allowing you to selectively power different components and prevent unwanted battery drain.Your battery switch interacts with nearly every electrical component in your travel trailer.
In the “Off” position, it completely isolates the batteries, preventing any drain. In the “Battery” position, it connects your house batteries directly to the trailer’s 12-volt DC system, powering lights, water pumps, and other DC appliances. The “Both” or “Combine” position (if available) connects both the shore power (AC) and the house batteries, allowing you to run AC appliances while simultaneously charging your batteries.
Finally, the “Shore Power” position (if available) connects only shore power, bypassing the house batteries completely.
Power Consumption Comparison
This table shows the approximate power consumption of common appliances, illustrating how the battery switch position affects their operation. Remember, these are estimates and actual consumption can vary depending on the specific appliance and its usage.
| Appliance | Power Consumption (Watts/Amps) | Battery Switch: “Battery” | Battery Switch: “Both” |
|---|---|---|---|
| LED Interior Lights | 5-10 Watts | Powered | Powered |
| Water Pump | ~3 Amps | Powered | Powered |
| Refrigerator (DC) | ~5 Amps | Powered | Powered |
| Air Conditioner | ~1500 Watts | Not Powered | Powered (from shore power) |
| Microwave | ~1000 Watts | Not Powered | Powered (from shore power) |
Best Practices for Extending Battery Life
Proper use of your battery switch significantly impacts battery lifespan. Consistent and mindful usage can prevent premature wear and tear, maximizing your investment.
Here’s how to make your batteries last longer:
- Always turn the battery switch to the “Off” position when your travel trailer is not in use for extended periods to prevent parasitic drain.
- When connected to shore power, utilize the “Both” or “Combine” position to charge your batteries while running AC appliances.
- Avoid leaving appliances running unnecessarily, especially when not connected to shore power. This conserves battery power.
- Regularly check your battery voltage to monitor their charge level and ensure they are charging properly. Low voltage indicates a problem that needs attention.
- Consider investing in a battery monitor to track your power usage and anticipate potential low-battery situations.
Safety Precautions and Maintenance
Working with your travel trailer’s battery system requires caution. Improper handling can lead to serious injury from electric shock, burns, or explosions from battery gases. Always prioritize safety when performing any maintenance or repairs.Maintaining your battery switch and associated components is crucial for reliable power and preventing costly repairs down the road. Regular checks and preventative maintenance will extend the lifespan of your system and ensure safe operation.
Safety Precautions When Working with the Battery Switch
Before beginning any work near your travel trailer’s batteries or battery switch, always disconnect the negative (-) terminal first. This prevents accidental shorts and protects you from electrical shock. Use insulated tools to avoid accidental contact with metal parts. Wear safety glasses to protect your eyes from potential sparks or battery acid splashes. Ensure adequate ventilation, as battery gases are flammable and toxic.
Never work on the battery system in a confined space or near open flames. If you’re unsure about any step, consult a qualified RV technician.
So, you’re planning a trip? Awesome! Don’t forget travel insurance! Seriously, it’s a lifesaver. Check out Aon travel insurance for comprehensive coverage. They’ve got options for everything from lost luggage to medical emergencies. And if you need something more tailored to your specific needs, consider exploring Aon travel insurance – they might have a better fit for your adventure.
Getting insured is just smart planning; peace of mind is priceless!
Battery Switch and Related Component Maintenance Schedule
A regular maintenance schedule will help prevent issues and extend the life of your battery system. Inspect the battery switch and its connections monthly for corrosion, loose wires, or damage. Clean the terminals with a wire brush and baking soda solution to remove corrosion. Tighten any loose connections. Check the battery cables for wear and tear and replace them if necessary.
Have your batteries professionally tested annually to assess their state of charge and overall health. Consider a battery equalization charge once or twice a year, especially if you have multiple batteries connected in parallel, to balance their charge levels and extend their lifespan. This should be done by a professional or following the instructions provided by your battery manufacturer.
Safely Disconnecting the Battery Switch
To safely disconnect the battery switch for maintenance or repairs, first turn off any appliances running off the battery system. Then, locate the main battery disconnect switch (usually clearly labeled). Using insulated pliers or a wrench, turn the switch to the “off” position. This will break the connection between the batteries and the rest of the electrical system.
Now you can safely work on the battery switch and associated components. Remember to reconnect the negative (-) terminal last when reinstalling the components.
Preventing Common Battery Switch Malfunctions
Regular cleaning and tightening of connections will go a long way in preventing malfunctions. Avoid overloading the battery system by using too many high-power appliances simultaneously. Use appropriately sized wiring and fuses to protect the system from overcurrent. Protect the battery switch and wiring from moisture and extreme temperatures. Properly store your travel trailer during periods of non-use to prevent corrosion and damage.
Regularly inspect the fuse box for blown fuses, which can indicate a problem in the system. Addressing these issues promptly can prevent more significant problems and ensure safe and reliable operation.
Battery Switch Types and Selection
Choosing the right battery switch for your travel trailer is crucial for reliable power management and safe operation. Different types of switches offer varying levels of control and complexity, so understanding your needs is the first step. This section will break down the common types and help you determine which one best suits your setup.Selecting a battery switch involves considering several key factors beyond just the number of batteries you have.
The amperage rating, the type of switch mechanism (rotary, rocker, etc.), and the overall build quality all play a role in its longevity and performance. A poorly chosen switch can lead to overheating, premature failure, and even potential safety hazards.
Types of Battery Switches
Battery switches primarily fall into three categories: single, dual, and rotary. Single switches are the simplest, allowing you to connect or disconnect a single battery bank to your trailer’s electrical system. Dual switches offer more control, typically allowing you to switch between two battery banks (like a house battery and a starting battery) or to completely isolate both. Rotary switches, often found in larger RVs, provide a more complex system of connections, including options to connect both batteries in parallel or to isolate them entirely.
So, you’re planning a trip? Awesome! Don’t forget travel insurance! Seriously, it’s a lifesaver. Check out Aon travel insurance for comprehensive coverage. They’ve got options for everything from lost luggage to medical emergencies. And if you need something a bit more tailored to your specific needs, maybe explore Aon travel insurance – they often have specialized plans.
Getting insured is just good practice, trust me.
The choice depends entirely on the number of batteries and the level of control desired.
Factors to Consider When Selecting a Battery Switch
Several factors influence the selection of an appropriate battery switch. These include the number of batteries in your system (single, dual, or more), the amperage draw of your appliances (determining the required amperage rating of the switch), the ease of use (rotary switches offer more options but can be less intuitive), and the overall quality and durability of the switch’s construction.
A high-quality switch will be more resistant to corrosion and offer better protection against electrical surges. Consider the environment the switch will be in (exposed to elements or inside a compartment) and choose a switch with an appropriate level of weather protection.
Battery Switch Specifications
The following bullet points Artikel the specifications of various battery switches, keeping in mind that these are examples and actual specifications will vary by manufacturer and model:
- Single Battery Switch: Typically rated for 100 amps or less. Simple on/off functionality. Often found in smaller trailers with a single battery.
- Dual Battery Switch (Rocker): Commonly rated between 75-150 amps. Offers three positions: Battery 1, Battery 2, or Off. Easy to use with clear visual indication of the selected position.
- Dual Battery Switch (Rotary): Available in various amperage ratings (100-200 amps or more). Provides multiple connection options, including parallel connection of both batteries or complete isolation. More complex but offers greater control.
- Rotary Switch (Multi-Bank): Can manage three or more batteries, with various combinations of parallel and isolated connections. High amperage ratings (200 amps and above) are common. More complex and generally found in larger RVs.
Impact of Amperage Ratings on Battery Switch Performance
The amperage rating of a battery switch indicates the maximum current it can safely handle. Choosing a switch with an insufficient amperage rating can lead to overheating, damage to the switch, and potentially a fire hazard. The total amperage draw of all devices connected to the battery through the switch must be less than the switch’s rated amperage.
For example, if your trailer has appliances that draw a combined 120 amps, you’ll need a switch with at least a 150-amp rating to provide a safety margin. Using a lower rated switch will lead to overheating and potential failure. Higher amperage switches generally cost more, but they offer better protection and increased longevity. Always ensure your switch’s rating exceeds the expected maximum current draw of your trailer’s system.
Visual Representations of Battery Switch Systems
Understanding how a travel trailer’s battery switch system works is easier with visual aids. The following diagrams and descriptions will help clarify the system’s components and their interactions.
A clear understanding of your battery switch system is crucial for safe and efficient power management in your RV. These diagrams will illustrate the typical setup and power flow.
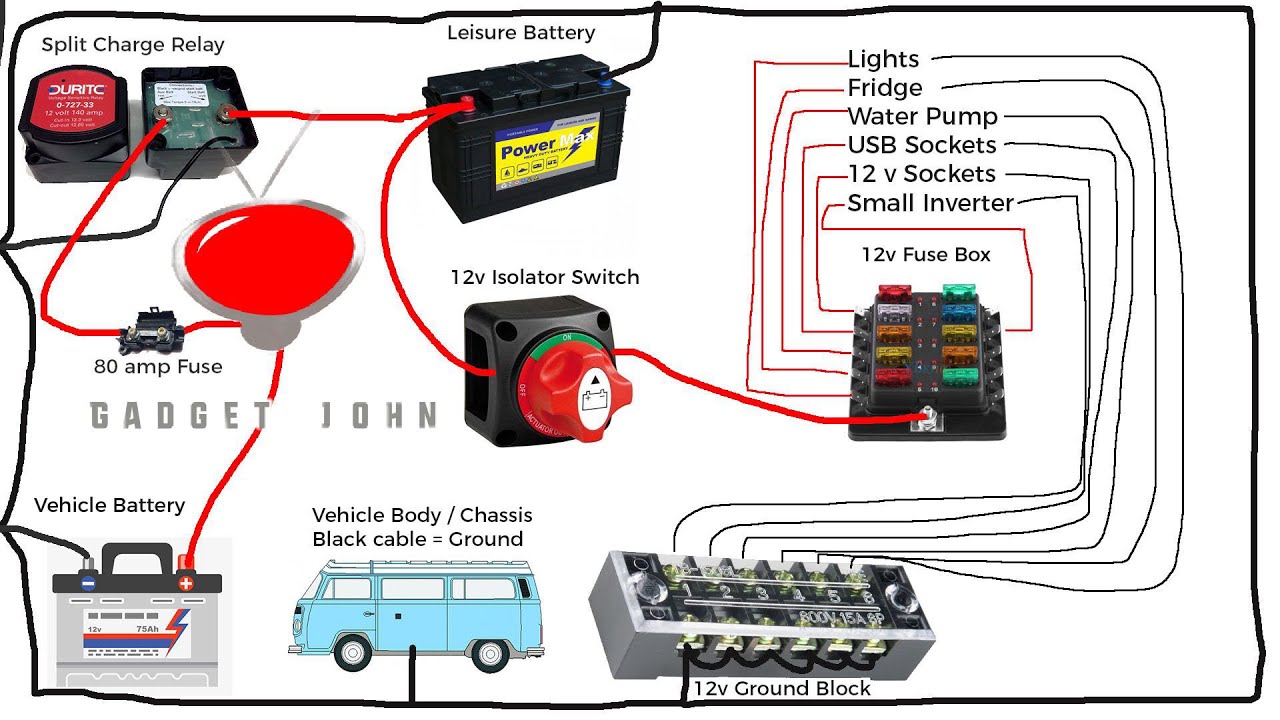
Typical Travel Trailer Battery Switch System Diagram
Imagine a diagram showing two batteries (Battery 1 and Battery 2), typically 12-volt deep-cycle batteries, connected to a battery switch. This switch is usually a three-position switch: OFF, Battery 1, and Battery 2 & 1 (or similar labeling). From the battery switch, thick gauge wires lead to the trailer’s 12-volt distribution panel. This panel then distributes power to various 12-volt appliances within the trailer.
A separate wire connects the battery switch to the trailer’s converter/charger, which is connected to the shore power (AC power) inlet. A voltmeter is often included to display the battery voltage. Finally, a ground wire connects all components to the trailer’s chassis, completing the circuit. Each component is labeled clearly, indicating its function. The diagram depicts the physical connections between batteries, switch, panel, converter, and ground.
Power Flow in Different Operational Modes
The following diagram illustrates power flow through the battery switch in its three operational modes.
This diagram depicts three scenarios: the switch in the OFF position, the switch selecting Battery 1, and the switch selecting both Battery 1 and Battery 2. Arrows show the direction of current flow. Each scenario shows a different path for power, illustrating the switch’s control over power distribution.
Diagram: The diagram would show three separate sections, each representing a switch position. In the “OFF” position, no arrows would indicate power flow. In the “Battery 1” position, an arrow would show power flowing from Battery 1, through the switch, to the distribution panel and converter. In the “Battery 1 & 2” position, arrows would show power flowing from both Battery 1 and Battery 2, converging before the switch, and then proceeding to the distribution panel and converter.
A key would define all components and the direction of current flow (using arrows).
Mastering your travel trailer’s battery switch is a simple yet powerful way to enhance your RVing experience. By understanding its function, troubleshooting potential problems, and implementing proper maintenance, you can ensure reliable power and extend the life of your batteries. Remember safety first – always disconnect power before working on your electrical system. Happy travels!
FAQ Corner
How often should I check my battery switch?
Inspect your battery switch monthly, looking for corrosion or loose connections.
What does it mean if my battery switch is hot to the touch?
A hot battery switch indicates a potential problem, like a loose connection causing high resistance and heat buildup. Turn off the switch immediately and investigate.
Can I use a battery switch with different amperage ratings?
No, using a battery switch with an amperage rating lower than your system’s needs can cause overheating and damage. Always match the amperage rating to your system’s requirements.
My battery switch won’t turn. What should I check first?
First, check the fuses and circuit breakers in your system. Then, inspect for corrosion on the terminals. If neither of those are the issue, you may have a faulty switch.
